
Digital Graphics
Digital graphics differ from traditional graphic arts in that they are presented electronically. Although both are typically created using sophisticated software on a computer, traditional graphic arts are designed with the aim of being printed (print media). Both forms focus on the concept of visual communication.
Graphics use art to communicate an idea, mental image or brand to an audience; this includes the creation of logos, banners, magazine layouts, posters, advertisements, and web pages. Graphics typically combine text and images to convey messages in a way that is more effective than either can on their own.
Knowledge Base - Unit Test 1
Unit Test 1 will be based on the information in the Knowledge Base Set at left.
Unit Test 1 will be administered on September 13 (A Day) and September 14 (B Day).
Sandwich Project

Tutorial
Rubric
The objective of this project is to obtain a better understanding of Photoshop Layers by creating the layers of a sandwich on a plate. Utilizing layers effectively is a key skill to have in order to create efficient and fully editable graphics. If layers are not used effectively, it can be detrimental to the success of your project.
You have been hired to create a graphic design for Tom's Diner. The owner wants a BLT sandwich with sides as a graphic for the diner. He has supplied you with an image of a plate from the diner, as well as images of the ingredients for the sandwich. You are to follow the directions given by the project manager to complete the project for the target audience. There is a PDF tutorial located to the right to help you complete this project. However, since this is the first project we will be completing in Photoshop, we will walk through this procedure together as a class. Remember as you look for other items on-line to add to your sandwich to make sure to find high resolution images with a solid color background.


Desert Collage

Tutorial
The desert collage project is designed to expand upon your skills with layering, and incorporate visual merging (making items blend into the background in a natural way).
You will need to use the images provided, as well as additional images. You may obtain the additional images from the internet.


Knowledge Base - Unit Test 2
Unit Test 2 will be based on the information in the Knowledge Base Set at left.
Unit Test 2 will be administered on September 28 (A Day) and October 1 (B Day).
Warhol Project

Now that you've learned how to precisely add color to a black and white image, apply that knowledge in a fun and personal setting. In this project, you are going to paint several renditions of a picture of yourself and arrange it in a grid. A famous artist that used this technique to develop pop art advertising is Andy Warhol. Mimic this technique to create an original, personal piece of art.
First you will use the on-board camera of the Apple iMac to take your picture. Be creative with your pose so your project will be appealing and interesting! You will apply a filter inside Photoshop to make it look like a black and white sketch, then use your selection and coloring techniques to create the Warhol effect. You want to have a minimum of 3 different colors per box. Remember to use bright colors!
As you work, save your project as a .psd and name it lastname + first initial + warhol.psd. When you are finished, save it again as a JPEG with the same name (ex: davisjwarhol.jpg) Post the .JPG file to your website. Don't forget to review the rubric to make sure you are meeting all of the project requirements!
Tutorial

B/W to Color Project

Tutorial
Rubric
Adobe Photoshop is a very powerful image editor that can bring life to otherwise dull and unexciting photos. Using the tools and features of the software, a photographer can take his or her pictures to the next level and produce professional-looking images.
In this project, you will learn how to use the selection and coloring tools of Photoshop to add a splash of color to a black and white photo. The overall goal is to bring a dull photo back to life by accurately coloring the components to make them seem life-like.
Choose one of the black and white images below and use the refined selection tools of Photoshop to carefully select particular areas and add color. Be sure to add each color on its own layer just in case you need to make adjustments later on. Leaving several colors on the same layer (especially the background layer) can result in you having to start your project all over again.


Knowledge Base - Unit Test 3
Unit Test 3 will be based on the information in the Knowledge Base Set at left.
Unit Test 3 will be administered on October 12 (A Day) and October 17 (B Day).
Reflections Project

Tutorial
Rubric
You have been hired by a image editing company that wants you to design an product display for their biggest client. Your job is to take a group of products and showcase them on a stage that reflects their image to make them seem more appealing and attractive.
Create a new Photoshop document that is 720 x 480 pixels. Create a stage and a background for your products. You can create a color background with highlight and add a filter. Place at leastthree different objects on the stage, the manufacturer logo on the wall, and create a reflection on the stage for each item that touches the stage. All of the products must be made by the same manufacturer. Make sure you orient the objects in the most appealing way and make them look good! All objects that are on the stage must reflect. Do not use images that are tilted at an angle. They are more difficult to reflect.
There is a PDF tutorial located to the left to help you complete this project.


Beetle Ad Project
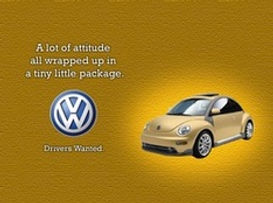
You have been hired as a graphic designer by VW. They want to see what other colors they should offer in the beetle and to see an example of how toadvertise their product. Your final product must be a well-developed, attractive advertisement complete with the car's manufacturer logo and unique catchy slogan. Your background and your car should be the same color. Add a layer style to the text to make it stand out. Come up with an original catch phrase slogan. There is a PDF tutorial located to the left to help you complete this project.
Be sure to arrange your components in a way that utilizes the Elements and Principles of Designand accomplishes your intended purpose. Your finished product will look similar to the example above, but may have a different background, different car color, and different catch phrase. Two-tone the car to challenge your skills and ablities.
Tutorial
Rubric


Backgrounds


Knowledge Base - Set 4 - Quarter One Test
This is the final Knowledge Base slide set. The Quarter One Test will be based on the information in all four of the Knowledge Base Sets.
The Quarter One Test will be administered on October 26 (A Day), and October 29 (B Day).
Selfie Magazine Cover Capstone


This is a Capstone project. This means that you will demonstrate what you've learned in the previous lessons without a project tutorial. As a capstone, this project counts double in the grade book.
You have learned some very useful tools and features of Adobe Photoshop by now. Now it's time to apply both your newly learned skills, and the knowledge we've been learning in class discussions. In this project, you will apply the Elements and Principles of Design to create an original, attractive magazine cover.
Choose your favorite magazine and create a magazine cover like it in Photoshop. Add a picture or two of the typical cover images this magazine would use - these could be products or famous people. Be sure your images are clean and attractive and not pixelated. The size of the project will be 8.5" width x 11" height in inches with 300 resolution. If these were going to be sent to an actual print company then you would use 300 as the resolution. Next, use font sites like dafont.com to select a couple appropriate fonts and add headlines and tag-lines (Teasers) to your magazine cover. Be sure to practice unity, balance, emphasis, and proportion!
Stamp Capstone

This is a Capstone project. This means that you will demonstrate what you've learned in the previous lessons without a project tutorial. As a capstone, this project counts double in the grade book.
You have been hired to create a collector set of 4 stamps for a foreign country (of your choosing). These should display prominent cultural icons, and be priced at the current valuation for mailing a letter within that country.
Create a collectors stamp set using the photoshop skills you've already learned. You will need to posterize your images (Image>Adjustments>Posterize). Keep the number of colors under 7.
Drag the master below to photoshop to create your stamp set. Do not forget to include an image, and text descriptor for each stamp in the set. Use examples at left to help you with layout.


This Ends Quarter One
Quarter Two
Illustrator Selfie


Beginner
Choose 2 PS

Intermediate
Choose 1 PS

Animorph Choose 3 PS
Intermediate
Choose 1 IL

Mid-Term Exam Study Guide
